Important before you begin
Choose one active copy of the lab inventory.
Windows and Android do not synchronize or merge changes. A backup can move the full lab between them, but restoring it replaces everything currently recorded on the destination. Finish work on the old device, create a fresh backup, restore it on the new device, verify the result, and then stop editing the old copy.
First run on a PC
Start fresh, bring a spreadsheet, or restore the complete lab.
Watch the walkthrough
Start CryoIndex on Windows
Captions are available in the player and start turned off so they do not cover the app. The written transcript is below the video.
Read the video transcript
On Windows, setup begins by naming the lab. From this first screen, an existing lab can start from a CSV spreadsheet or restore a CryoIndex backup onto a replacement PC.
Choose an existing CSV with the standard Windows Open dialog. CryoIndex reviews the file and asks for confirmation before it writes any inventory.
After setup, the desktop dashboard keeps alerts and everyday tasks together. The lab database stays on this PC, and core inventory work does not require an account or an internet connection.
Narration uses an AI-generated voice.
- Enter the lab name and optional second line that should appear in the app and on reports.
- Choose I have a spreadsheet for current stock in CSV form, or Replacing a PC? Restore a backup when the complete CryoIndex database already exists.
- For a new lab without either file, continue through storage, people, and cell-line setup.
- When setup finishes, verify the lab name, storage capacity, users, cell lines, and vial count before routine work begins.
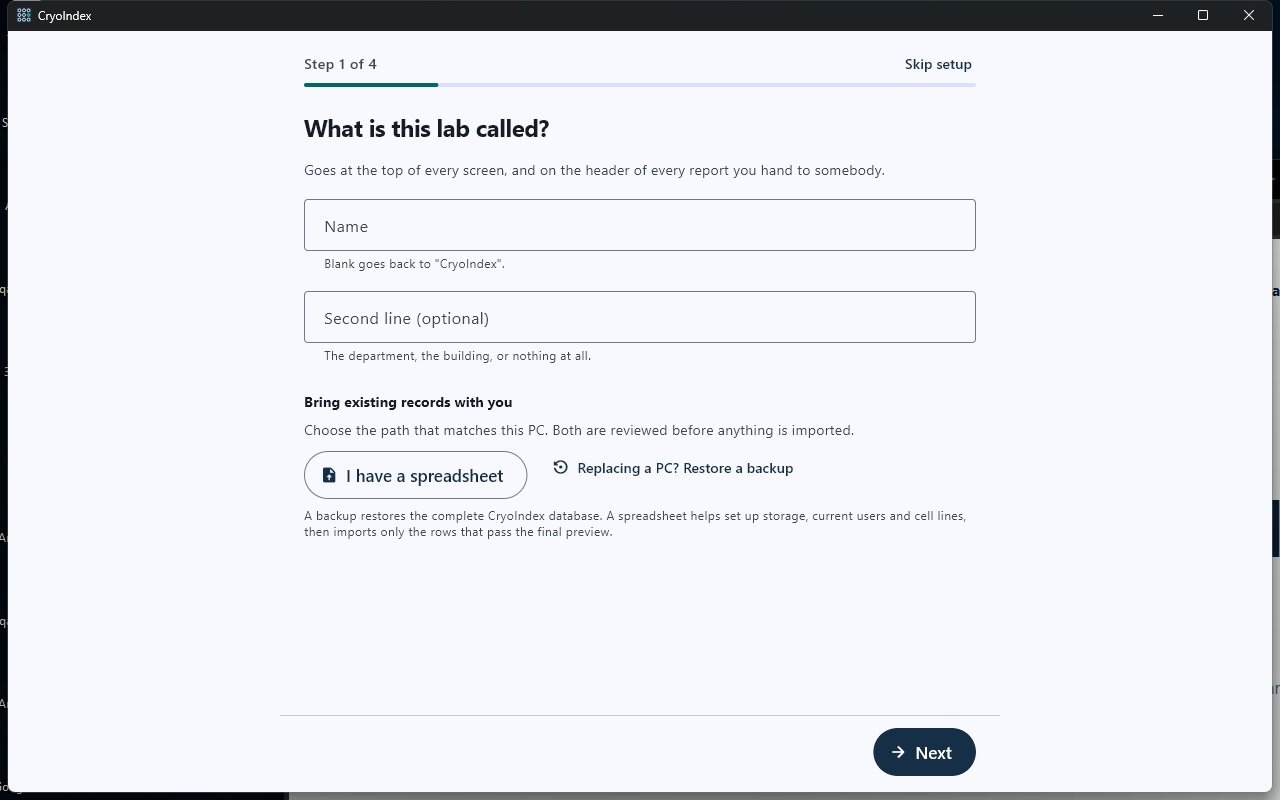
The first Windows screen separates a spreadsheet migration from a complete CryoIndex restore.
- Name the lab and add an optional report subtitle.
- Choose the existing-record path that matches the source file.
- Use Next only for a new manual setup.
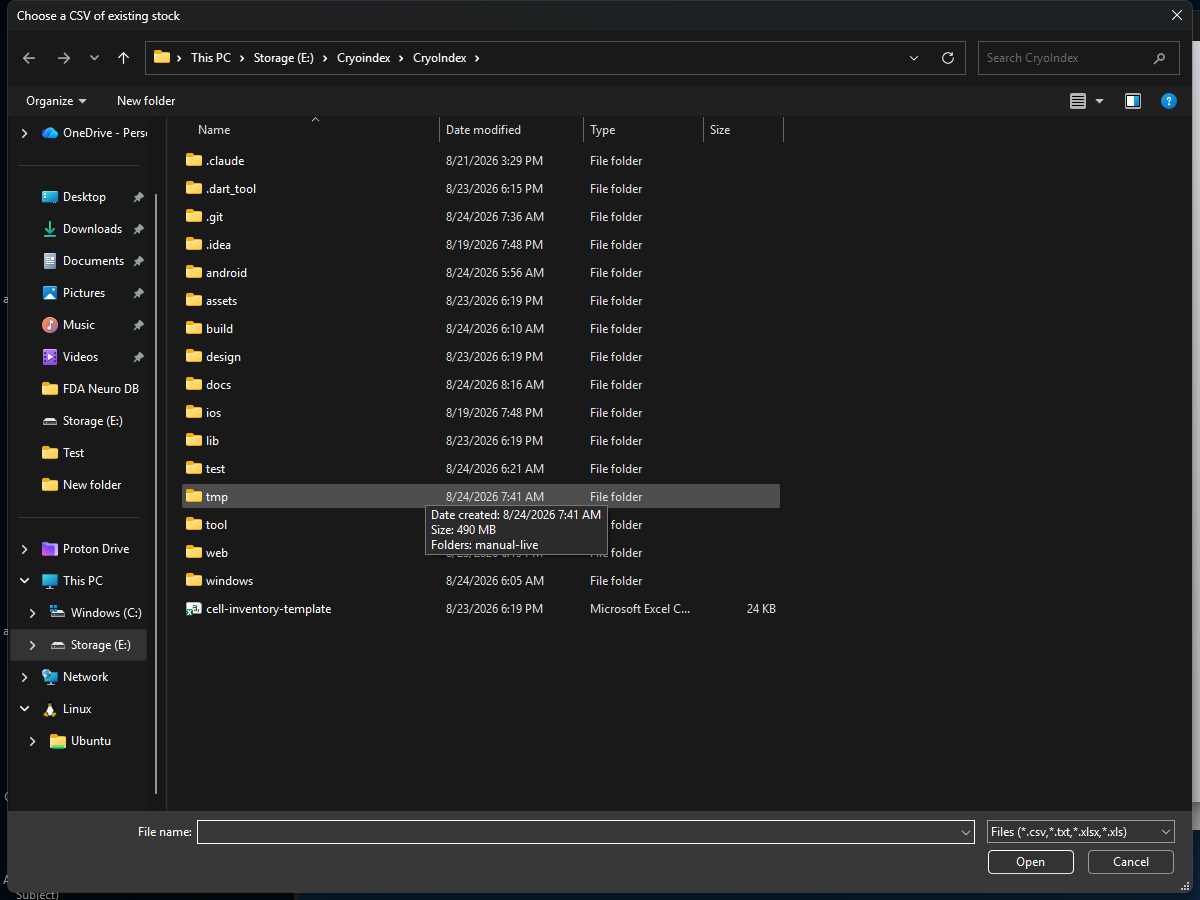
Windows controls the native Open dialog. Select the intended CSV, then return to CryoIndex for review.
- Locate the CSV prepared from the lab's spreadsheet.
- Confirm the file name, then choose Open.
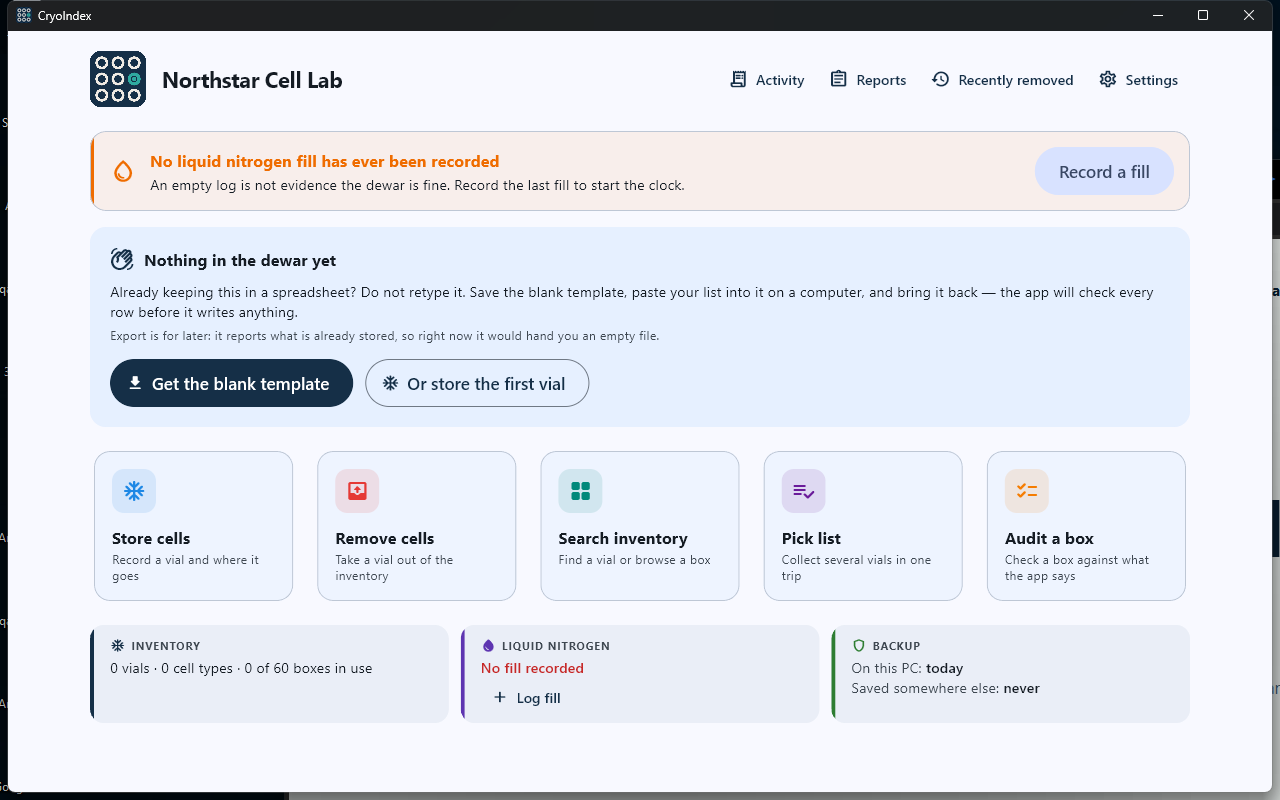
The Windows dashboard keeps alerts, daily tasks, inventory, nitrogen, and backup status in one desktop view.
- Resolve persistent alerts before they disappear from the dashboard.
- Open the same five everyday workflows used on Android.
- Check inventory, nitrogen, and backup status before leaving the PC.
Manual entry and HID scanners
Windows uses the keyboard path, not the tablet camera.
Watch the walkthrough
Enter barcodes and configure a scanner on Windows
Captions are available in the player and start turned off so they do not cover the app. The written transcript is below the video.
Read the video transcript
Windows does not show the tablet camera button. Type the printed barcode, or let a USB or Bluetooth scanner type it into the active Barcode field.
The same approach works in Search: click the barcode or donor-code field, then type or scan. Cell type and passage remain separate filters.
Use a scanner configured as HID, keyboard wedge, or keyboard emulation. It must send the label unchanged and finish each scan with Enter. Scanner prefixes, suffixes, code identifiers, and GS1 formatting are changed in the scanner, not in CryoIndex.
The Windows help section keeps scanner, keyboard, backup, spreadsheet, and storage guidance available offline. More detailed articles can be opened on the CryoIndex website from another device.
Narration uses an AI-generated voice.
- Click the Barcode field before scanning, or type the printed identifier exactly.
- Configure the scanner as HID, keyboard wedge, or keyboard emulation—not as a serial or virtual COM device.
- Make the scanner send one Enter key after each barcode and leave the label unchanged. Disable prefixes, suffixes, code identifiers, GS1 parentheses, and case conversion.
- Test several known labels in a plain text editor and in CryoIndex before using the scanner for routine inventory work.
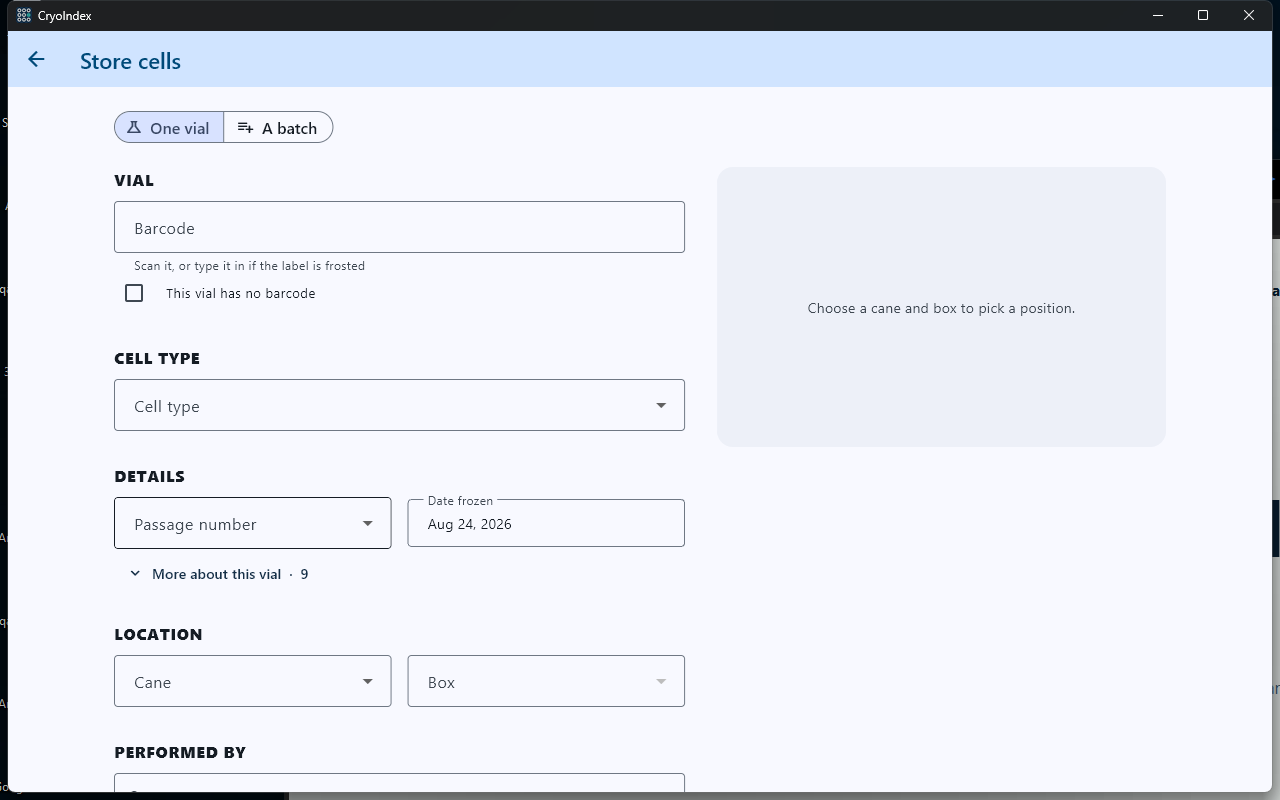
Click Barcode before typing or scanning. Windows intentionally has no camera-scanning action, and Origin is answered before the biological details.
- Type or scan the identifier into the active Barcode field.
- Complete the cell details and choose the physical location before saving.
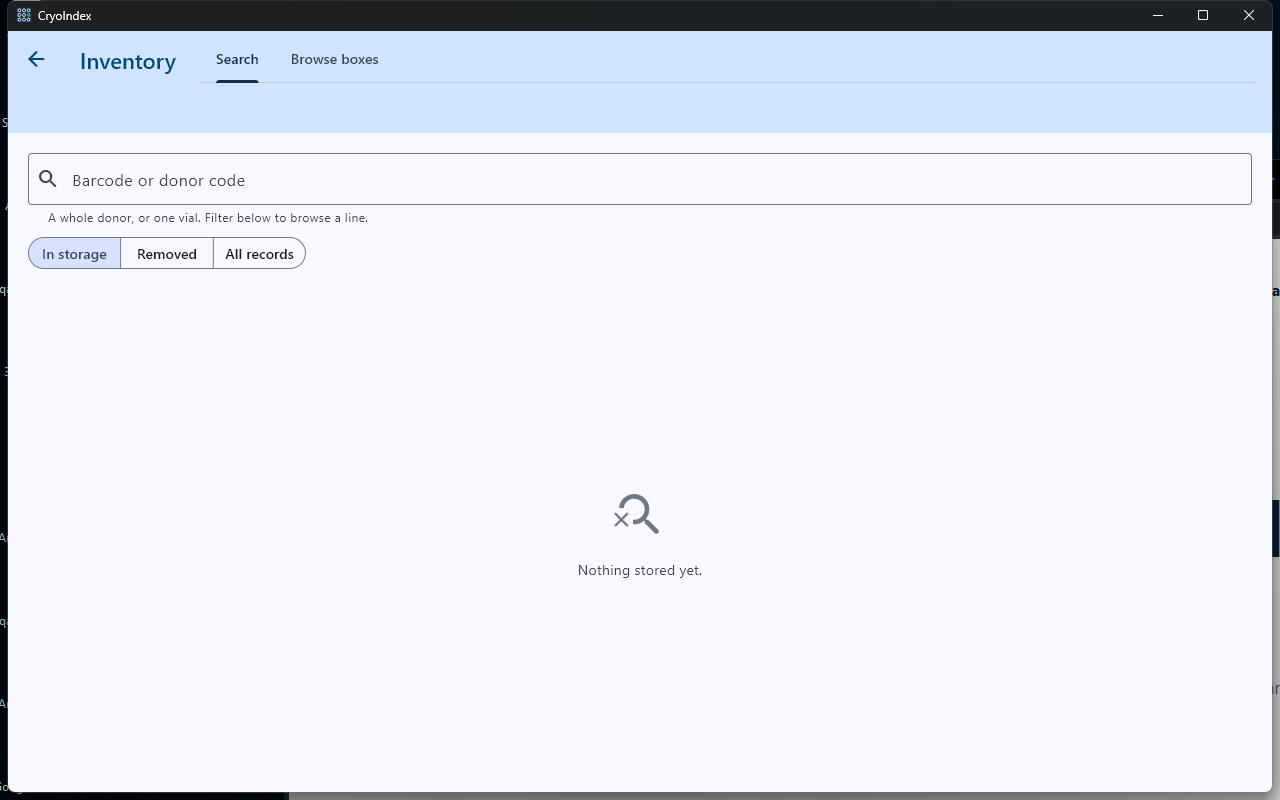
Search text matches barcode or donor code; cell line and passage use their own filters.
- Click here before typing or scanning a barcode or donor code.
- Choose whether to search in-storage, removed, or all records.
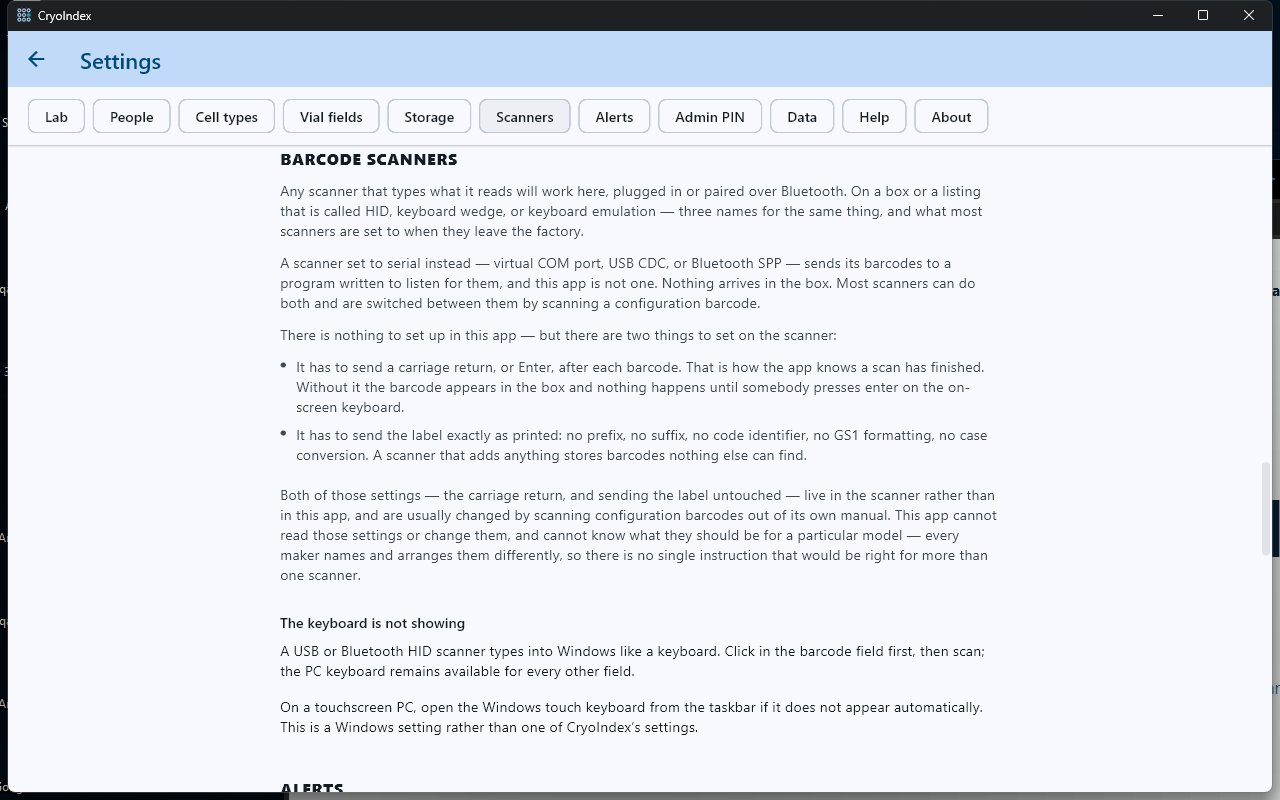
Scanner behavior is configured in the scanner itself. CryoIndex documents the two required output rules.
- Use the Scanners settings for the exact Windows requirements.
- Require Enter after each scan and the label exactly as printed.
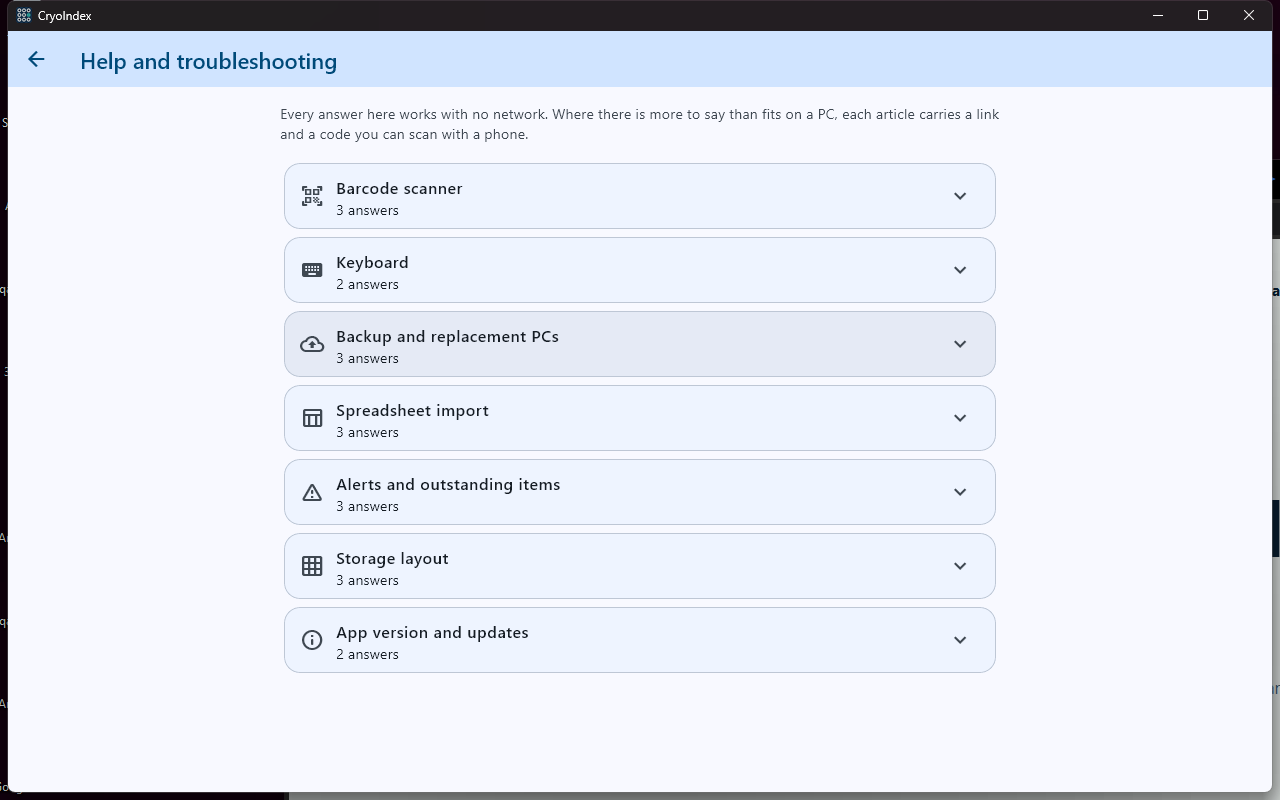
Windows help omits camera guidance and adds replacement-PC and keyboard-scanner wording.
- Open barcode-scanner and keyboard guidance without a network connection.
- Use the replacement-PC and spreadsheet sections for moving data.
Protect the whole lab
Save the backup somewhere the PC cannot take with it.
Watch the walkthrough
Back up the whole lab on Windows
Captions are available in the player and start turned off so they do not cover the app. The written transcript is below the video.
Read the video transcript
Open Backup to create a complete copy of the lab, including every vial, user, cell type, liquid-nitrogen fill, setting, and history entry. Three readable spreadsheets are saved beside it. A copy kept only on this PC does not protect the lab against losing the PC.
Save a copy asks for a folder, not a filename. Choose a removable drive, network location, or synchronized folder that remains available if this PC fails.
The backup and its three spreadsheets are written into the folder chosen here, in one step. CryoIndex validates the completed backup before reporting success, and asks whether the copy is kept somewhere this PC is not.
Return through Settings and Data whenever you need to back up, restore, import a CSV, or export the inventory. Restore replaces one inventory with another; it never merges two.
Narration uses an AI-generated voice.
- Open Settings → Data → Back up or restore, then choose Save a copy.
- Windows asks for a folder, not a filename. Choose a removable drive, approved network location, or synchronized folder outside the PC — the backup and its three readable spreadsheets are all written there.
- Wait for CryoIndex to validate and confirm the completed file. Keep more than one recent external copy.
- Before restoring, make a safety copy of the destination inventory. Restore replaces all current records and does not merge two labs.
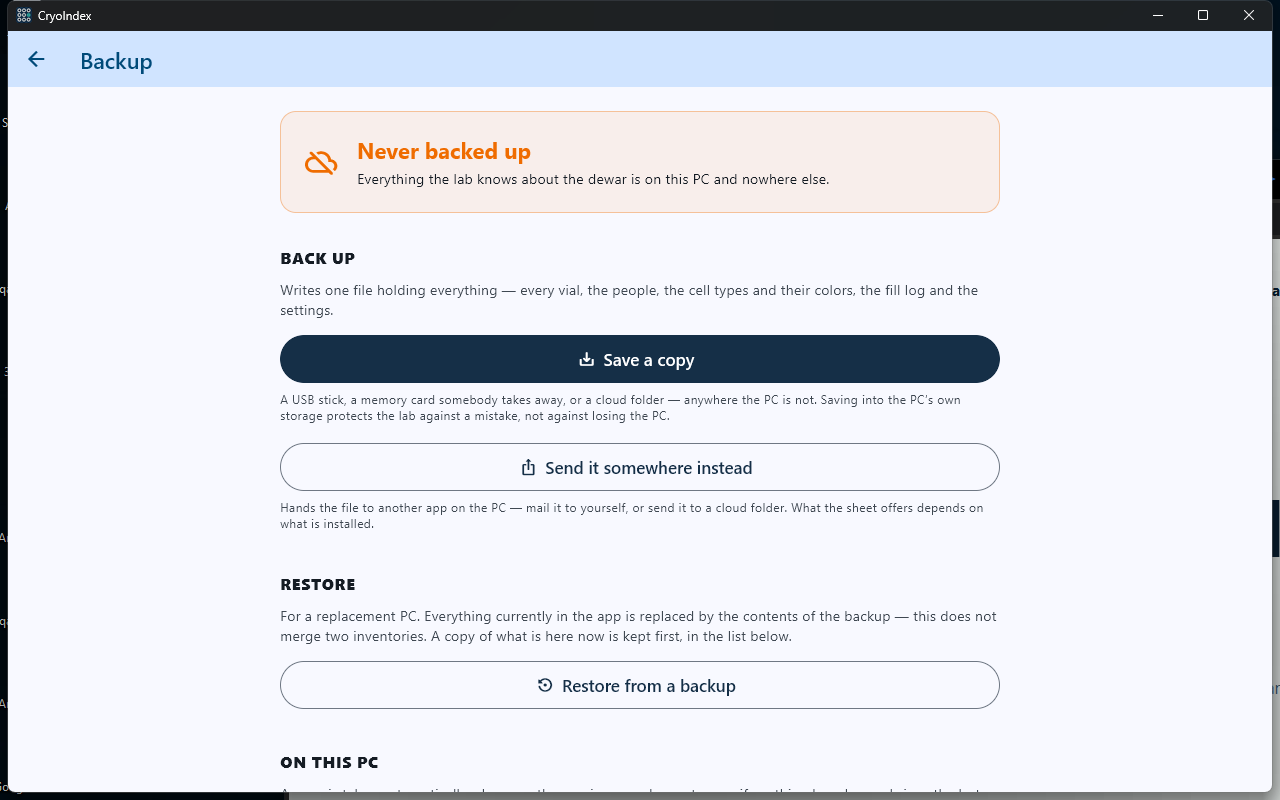
A copy kept only on the same PC protects against a mistake, not against losing the PC.
- Choose Save a copy for a complete external backup.
- Use restore only when replacing the current inventory.
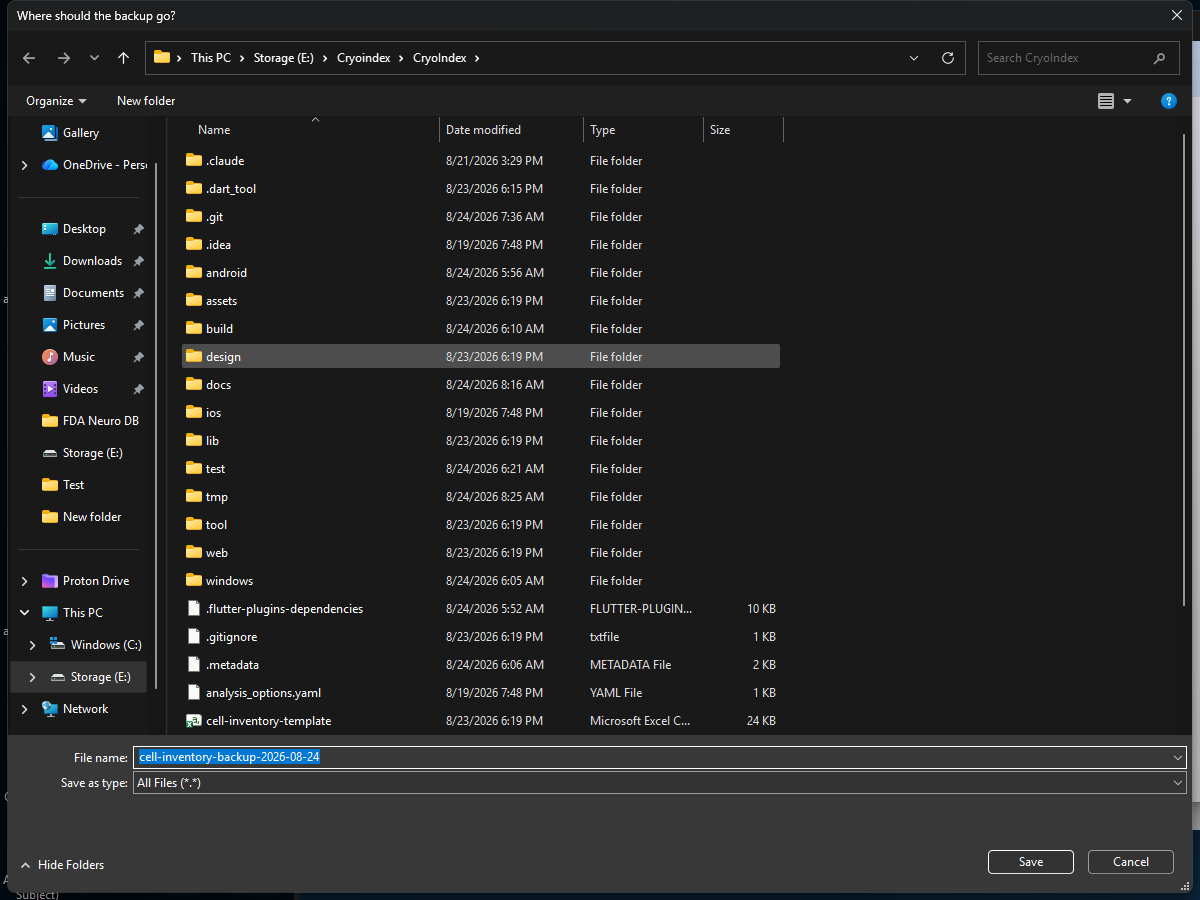
Windows asks for a folder, not a filename: the backup and its three readable spreadsheets are all written into the folder chosen here.
- Choose a destination that survives loss of this PC.
- Keep the proposed backup file name and choose Save.
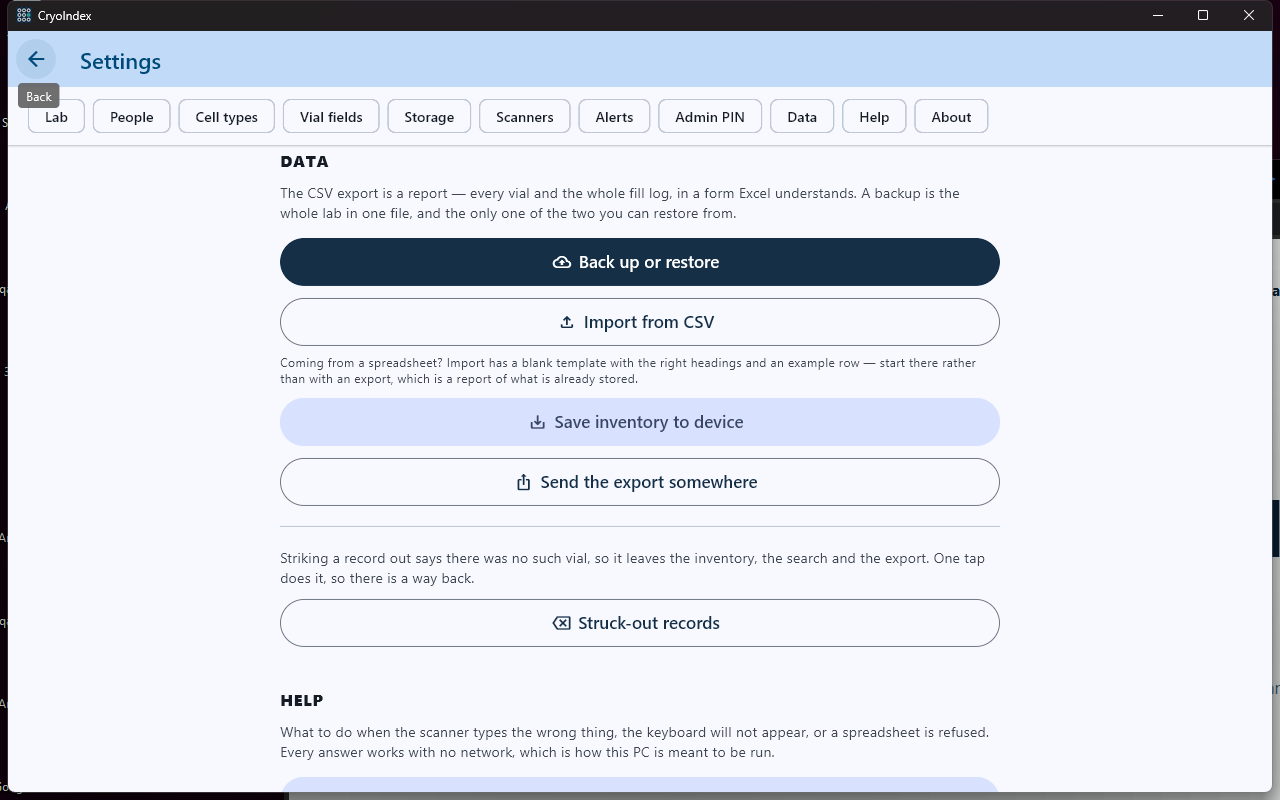
The Data section is the starting point for backup, restore, CSV import, and export.
- Open the complete backup and restore screen.
- Import existing stock from a CSV only after selecting the approving user.
Established-lab migration
Bring an Excel inventory into CryoIndex as CSV.
Watch the walkthrough
Import an established lab's CSV on Windows
Captions are available in the player and start turned off so they do not cover the app. The written transcript is below the video.
Read the video transcript
For an established lab, open Settings, Data, and Import from CSV. Select the person approving the import, then choose the file containing current stock.
The Windows Open dialog accepts the CSV you prepared in Excel or another spreadsheet program. A workbook must first be saved as CSV UTF-8, comma delimited.
After choosing the file, return to CryoIndex to review column mappings, skipped rows, unknown dates, and ignored fields. Nothing is imported until the final review is acknowledged.
Narration uses an AI-generated voice.
- In Excel, use Save As → CSV UTF-8 (Comma delimited). A workbook file cannot be read directly.
- In CryoIndex, open Settings → Data → Import from CSV and select the person approving the import.
- Choose the CSV in the Windows Open dialog. Review every proposed column mapping, ignored heading, skipped row, unknown date, user, cell line, and storage setting.
- Do not continue when the preview is surprising. Correct the spreadsheet or mapping and run the review again.
- Acknowledge the final review and import only when the accepted, skipped, and ignored counts are understood.
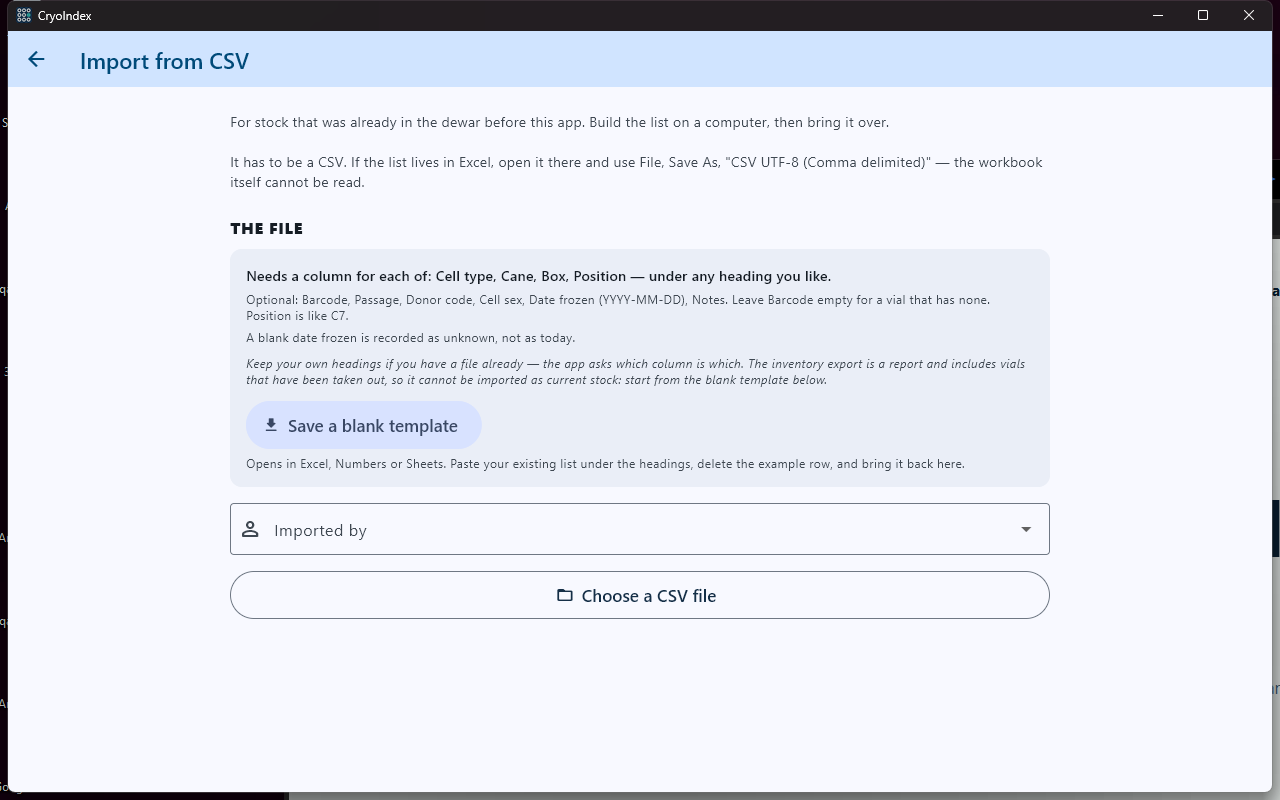
Select who is approving the import before choosing the lab's current-stock CSV.
- Use the blank template only when the existing headings need a clean starting point.
- Select the approving person, then choose the CSV.
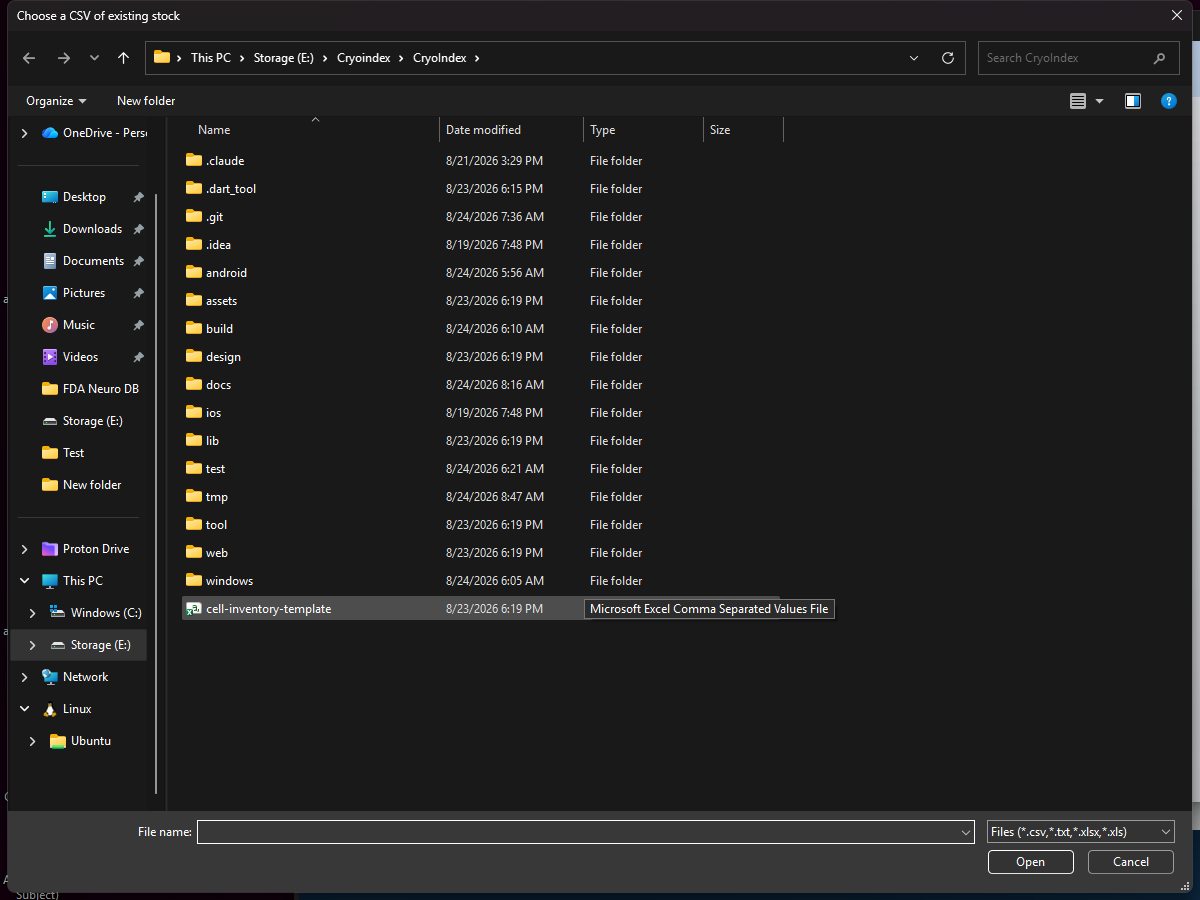
Choosing a file begins review; it does not immediately write the spreadsheet rows.
- Select the prepared CSV rather than the original Excel workbook.
- Choose Open, then review the file inside CryoIndex.
Need the full review sequence? Continue with Import a spreadsheet into an established lab. The mapping, refusal, acknowledgement, and final-import rules are the same on Android and Windows.